Monitoring IoT devices using heartbeats and MQTT gateways


When working with IoT (internet of things) devices one of the key issues is to keep track of the health of all installations. Most of the time, especially with smaller devices, the applications (firmwares) are flashed for a single time during setup and stay untouched at their location of action for a long while. Even if your fleet supports OTA (over the air updates) it is still essential to have a flexible solution for monitoring as well as the connectivity of your devices - especially when rolling out new updates.
A good combination of both can be achieved by combining device heartbeats (liveness pings) with the MQTT protocol. At iLert we have announced our new alert source type Heartbeats lately.
The following is a zero to hero guide to setup flexible heartbeat monitoring for IoT (in this example ESP8266) devices combining MQTT, the ilagent toolbox and ilert-arduino as well as the ilert API.
If you have a basic understanding of programming this guide will take you from zero to hero in terms of esp8266, mqtt and the ilert-arduino library.
In case you are already familar with esp8266 development and PlatformIO, you can skip the first part of this article.
Requirements
What is used in this guide:
- Wemos D1 Mini (ESP8266)
- Micro USB Cable (make sure to pick a good one, cheap cables e.g. of chargers might not work)
- Macbook with ESP8266 USB (Serial) driver for MacOS
- ilert account (free plan available)
- Visual Studio Code
- PlatformIO
- RasperryPI (optional, suggested as mqtt broker host)

Setup instructions
- You can purchase the Wemos D1 Mini (for private use and testing) easily from online warehouses like Amazon or Alibaba.
- Grab and install the driver for ur OS, you will have to restart your system afterwards.
- Download and install Visual Studio Code.
- Download and install PlatformIO for Visual Studio Code.
Open up Visual Studio Code and click on the PlatformIO icon in the left sidebar.

Navigate to open and select the Platforms menu. In the top bar navigate to Embedded and search for espressif82.

Click on the search result for Espressif8266 and install the platform on your device.
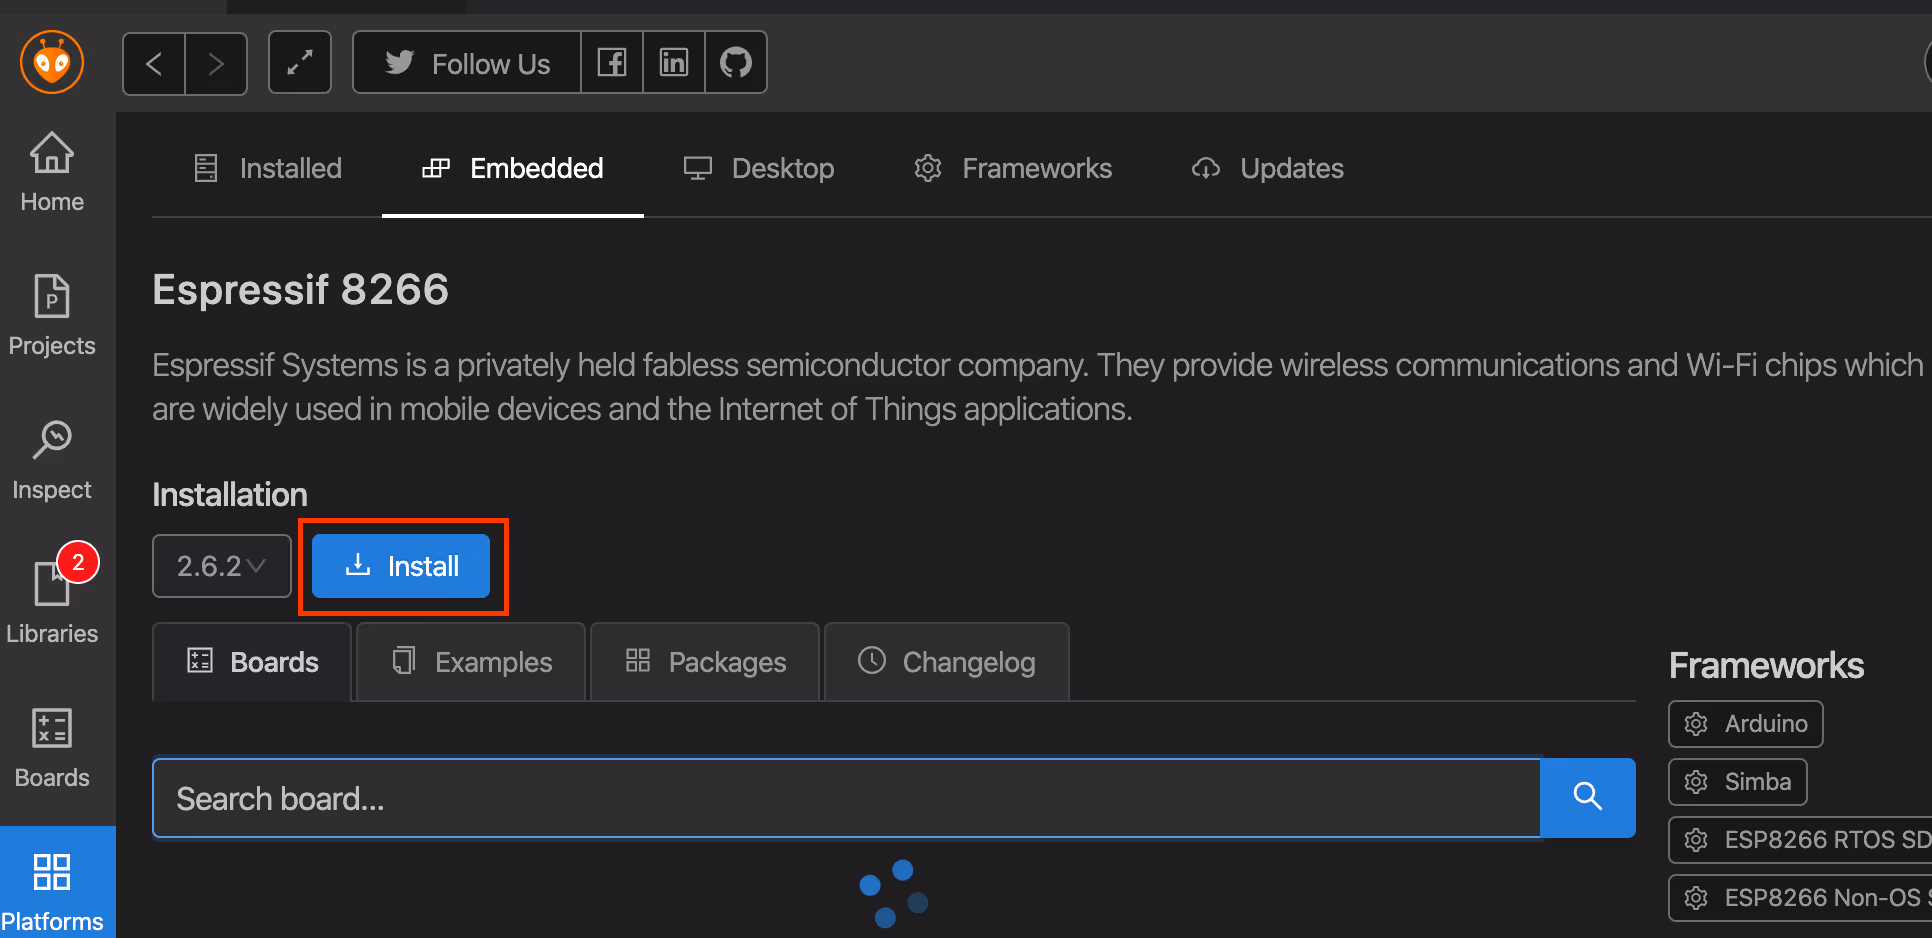
Your system is now ready to develop esp8266 applications.
Building and deploying software to the esp
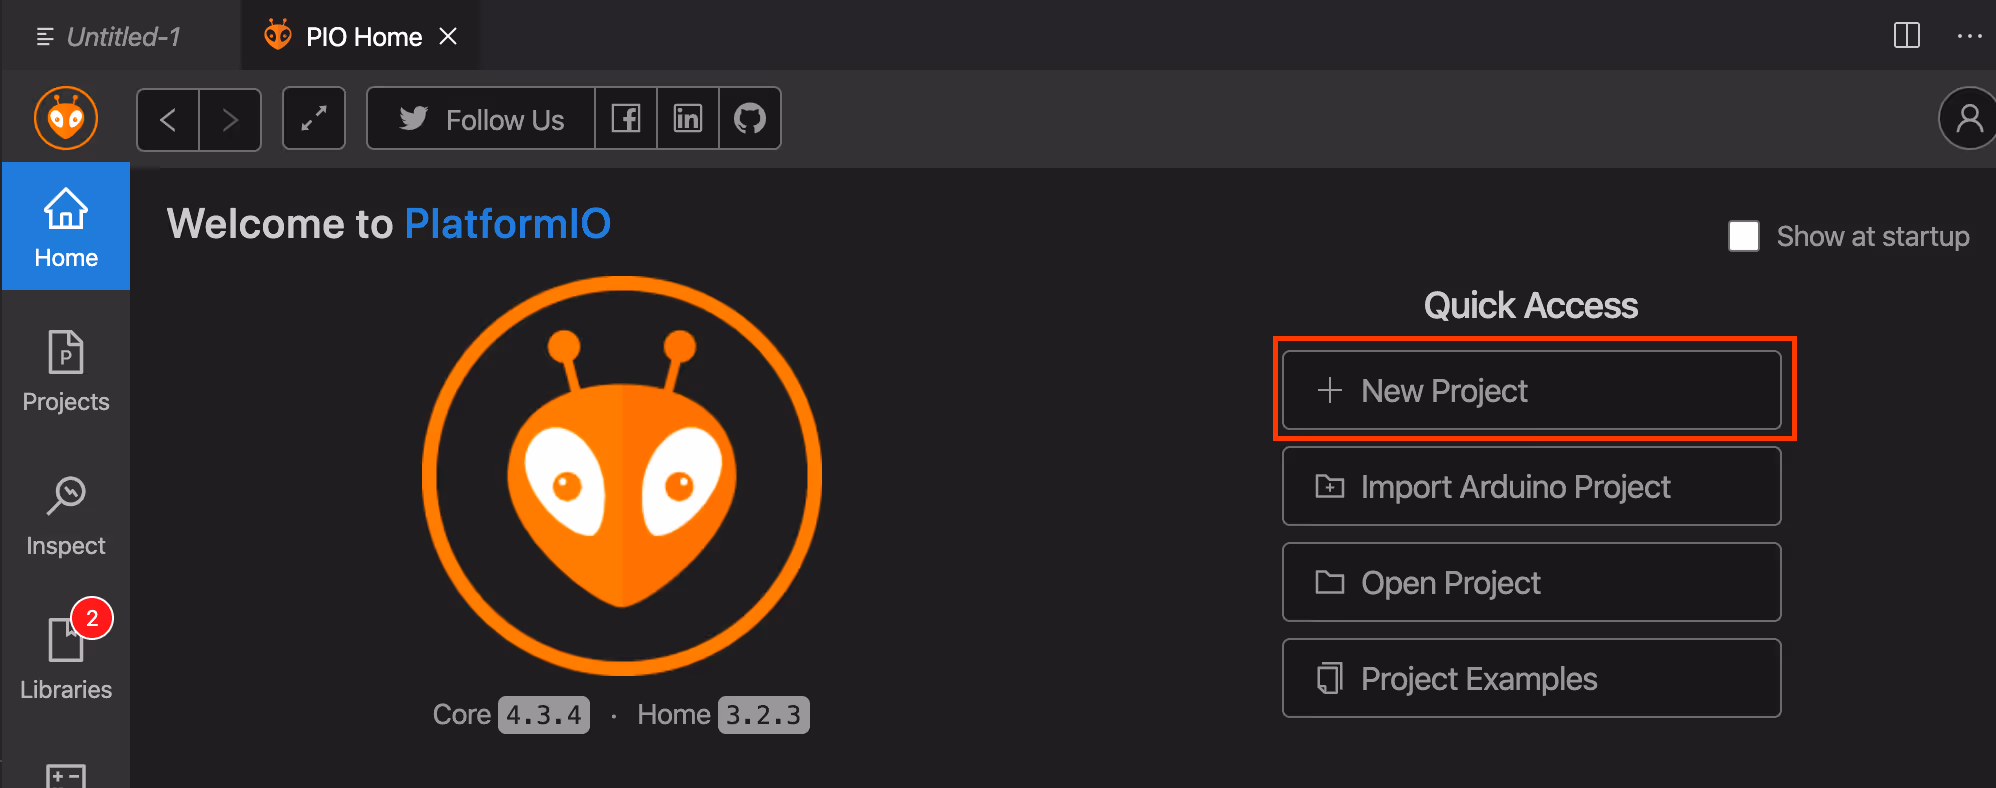
Create a new PlatformIO project.
Project creation
Choose your board, in our case Wemos D1 Mini Lite as part of the Espressif8266 family.
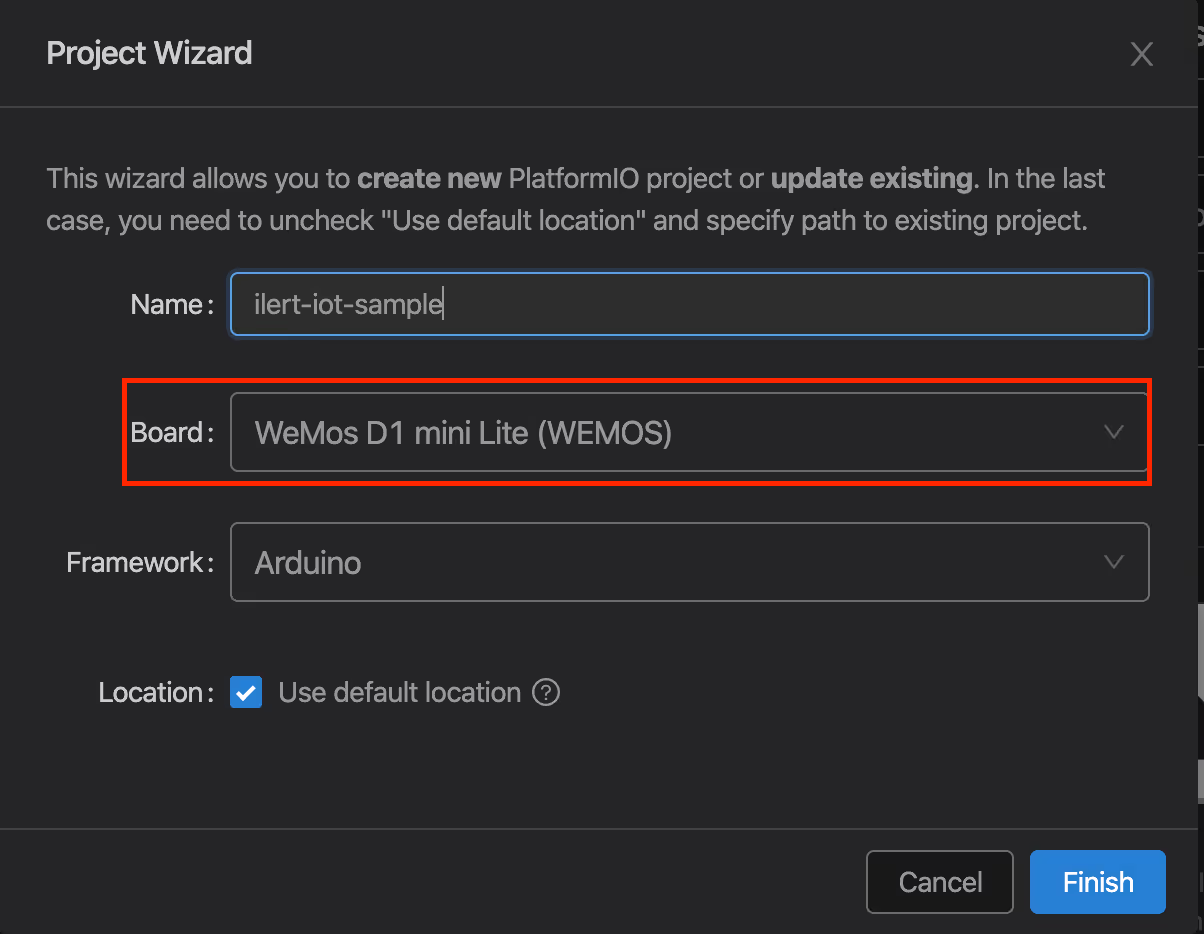
It will take a few moments for the project to be set up.
Upload (deployment) setup
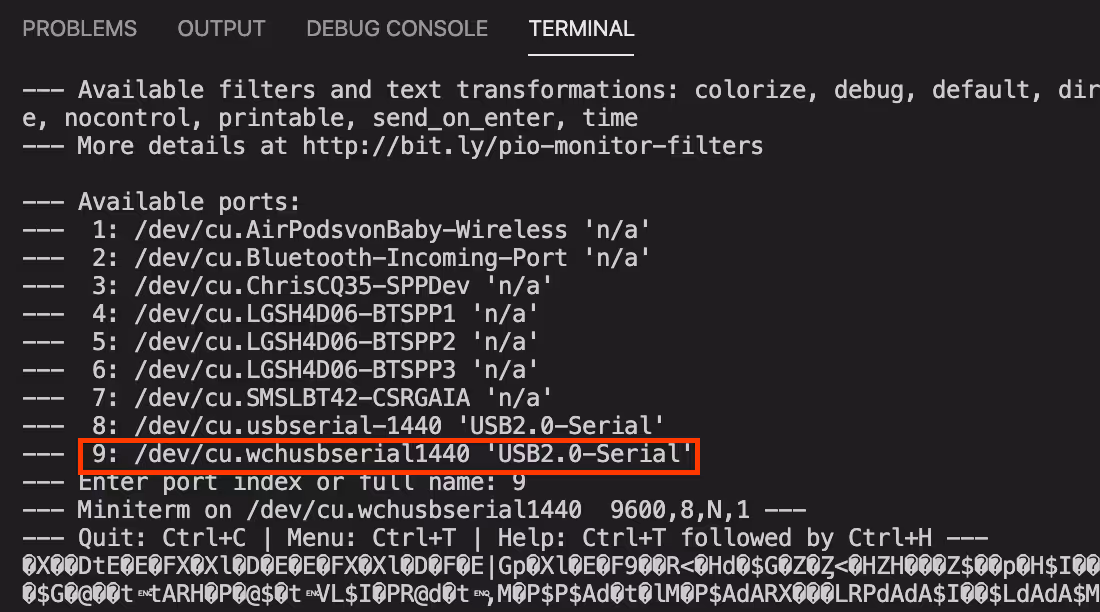
Lets run a quick test if everthing works correctly. Make sure to connect your ESP8266 to your device using the micro usb cable. Then click on the small serial port icon in your Visual Studio Code footer - the serial terminal will appear.
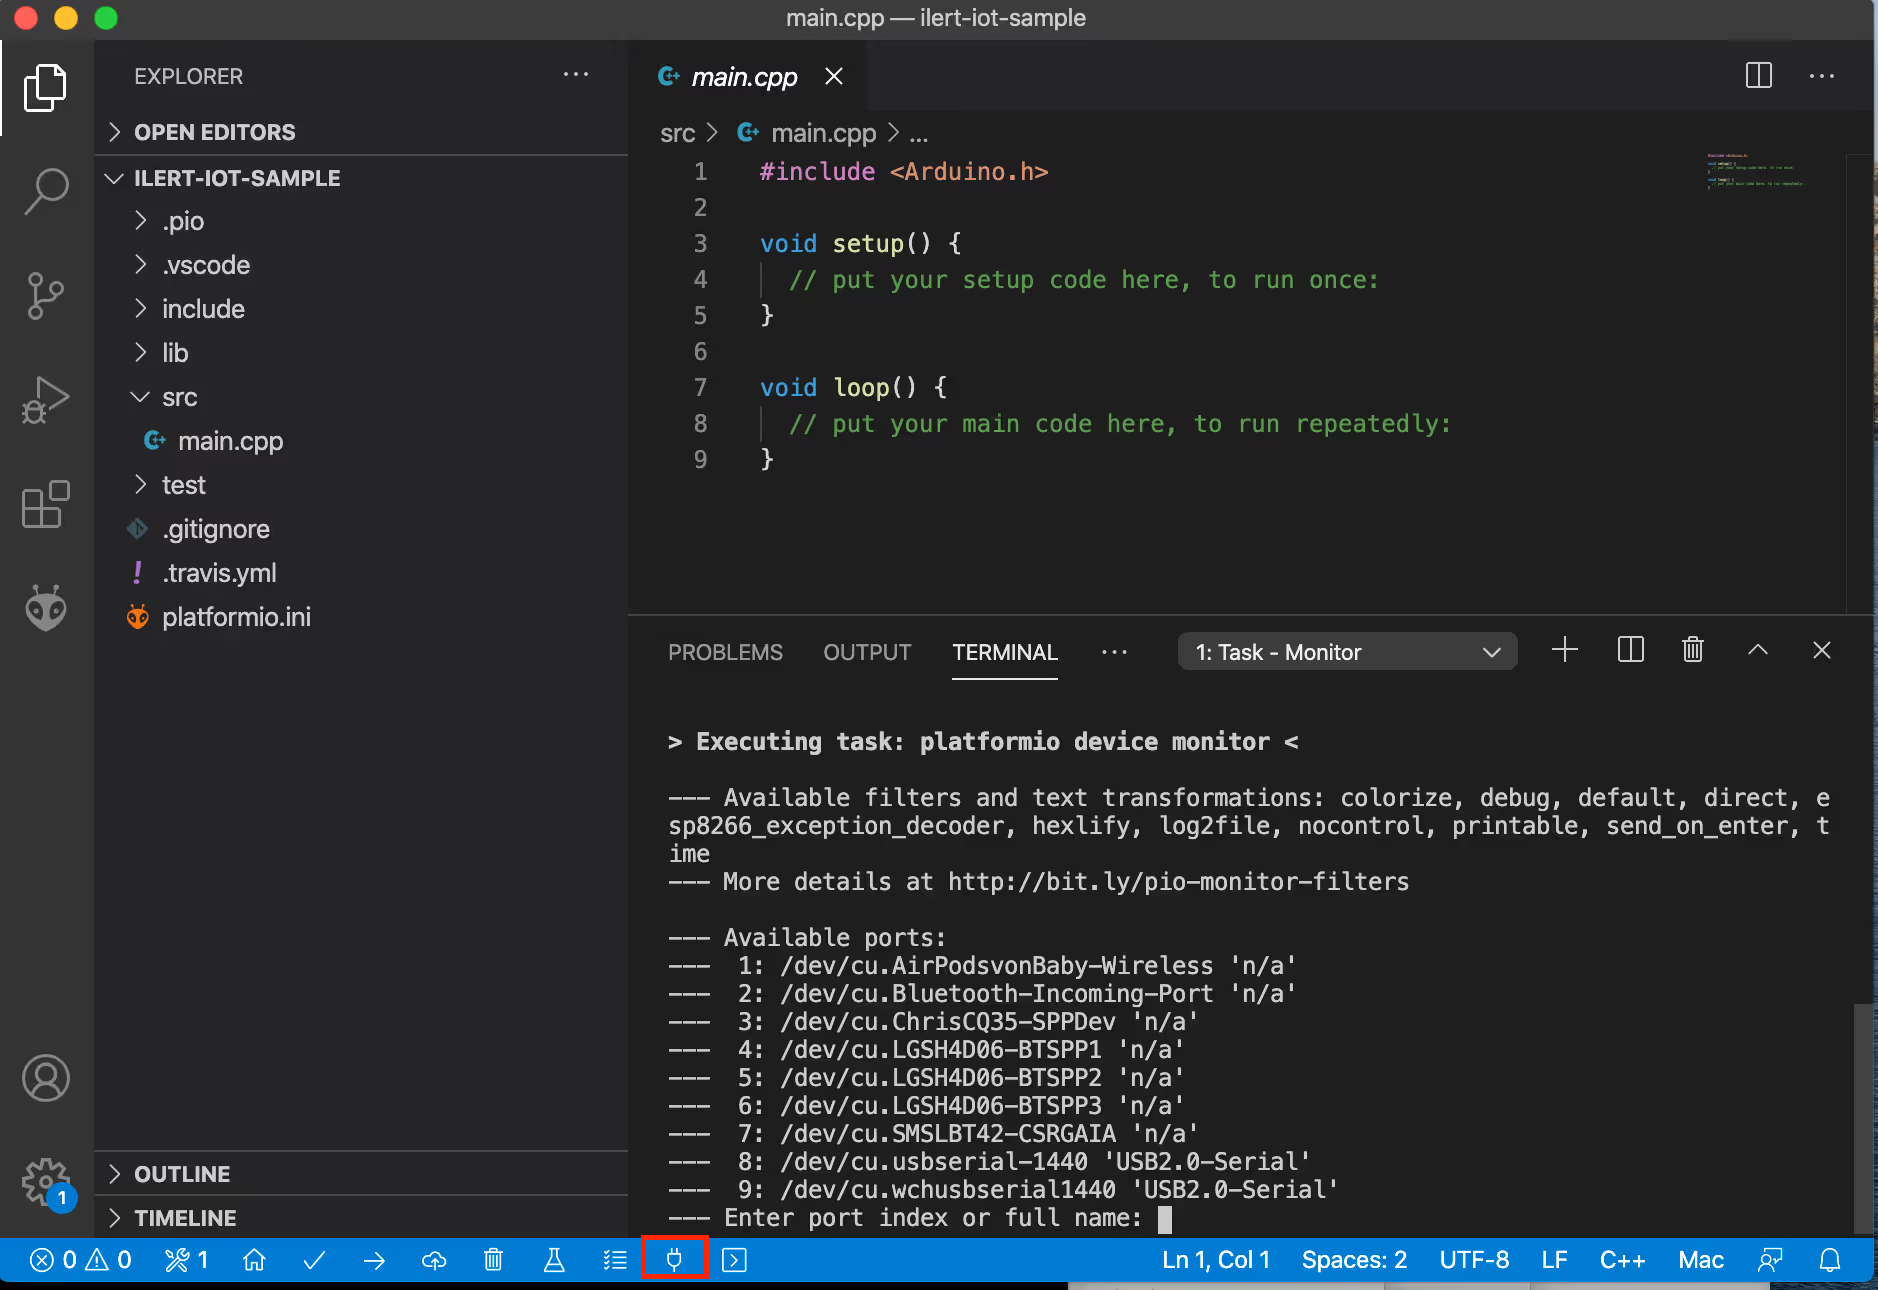
You should be able to see the ports of your esp device in our case /dev/cu.wchusbserial1440 on port 9.
To make the builds and uploads on the esp8266 device a bit easier, we are going to extend the platformio.ini file in your project root. Currently it should look like this:
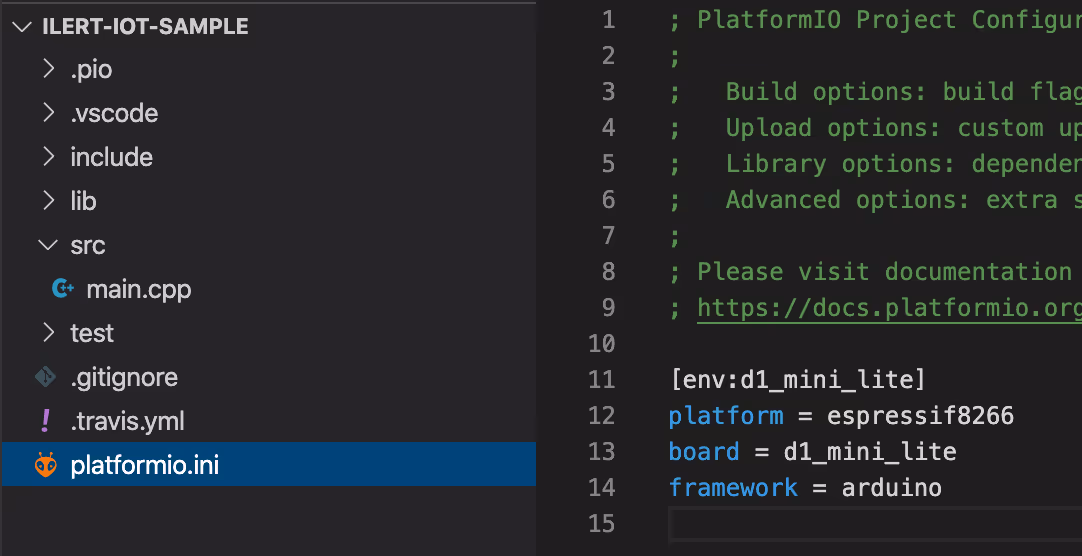
Lets add a few parameters and especially the upload_port of our device, so that we can simply run the deployment with a simple click. Update your platformio.ini file so that it looks the following:
In your case upload_port may require a different value, depending on the output of the serial terminal before
First build and deployment
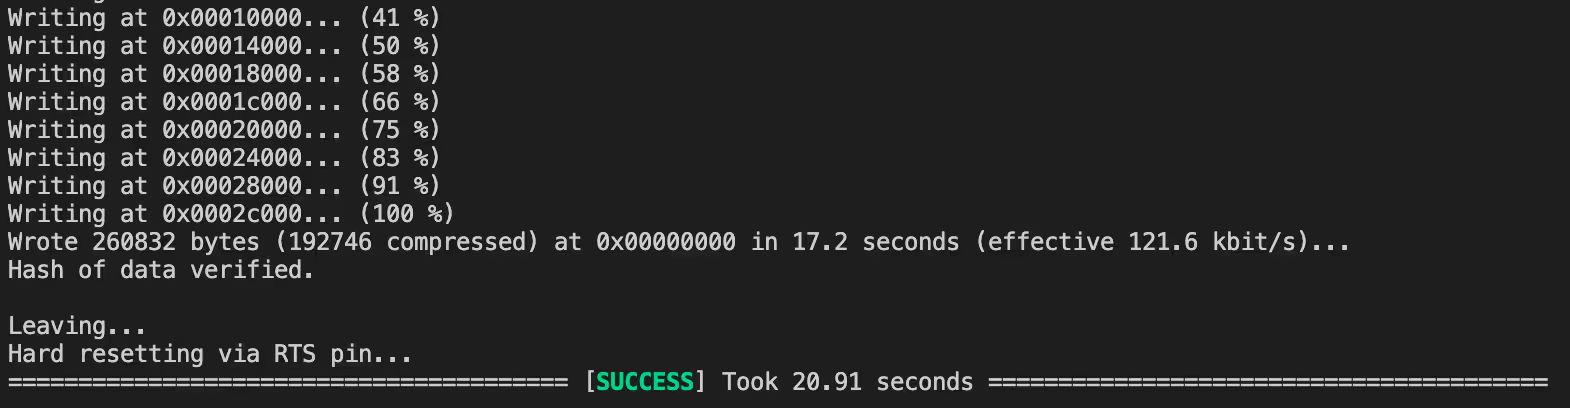
Click on the upload icon (arrow) in the footer to build and deploy your project on the device.

You should see the build and upload process in a new terminal window, it should end with a success message.
Alright, now that we know how to get our own software running on esp8266, we can continue with the heartbeat monitoring setup.
Creating a new heartbeat alert source
Login to your ilert account or create a new one (its free) if you do not have one already.
Navigate to the alert sources tab and create a new alert source.
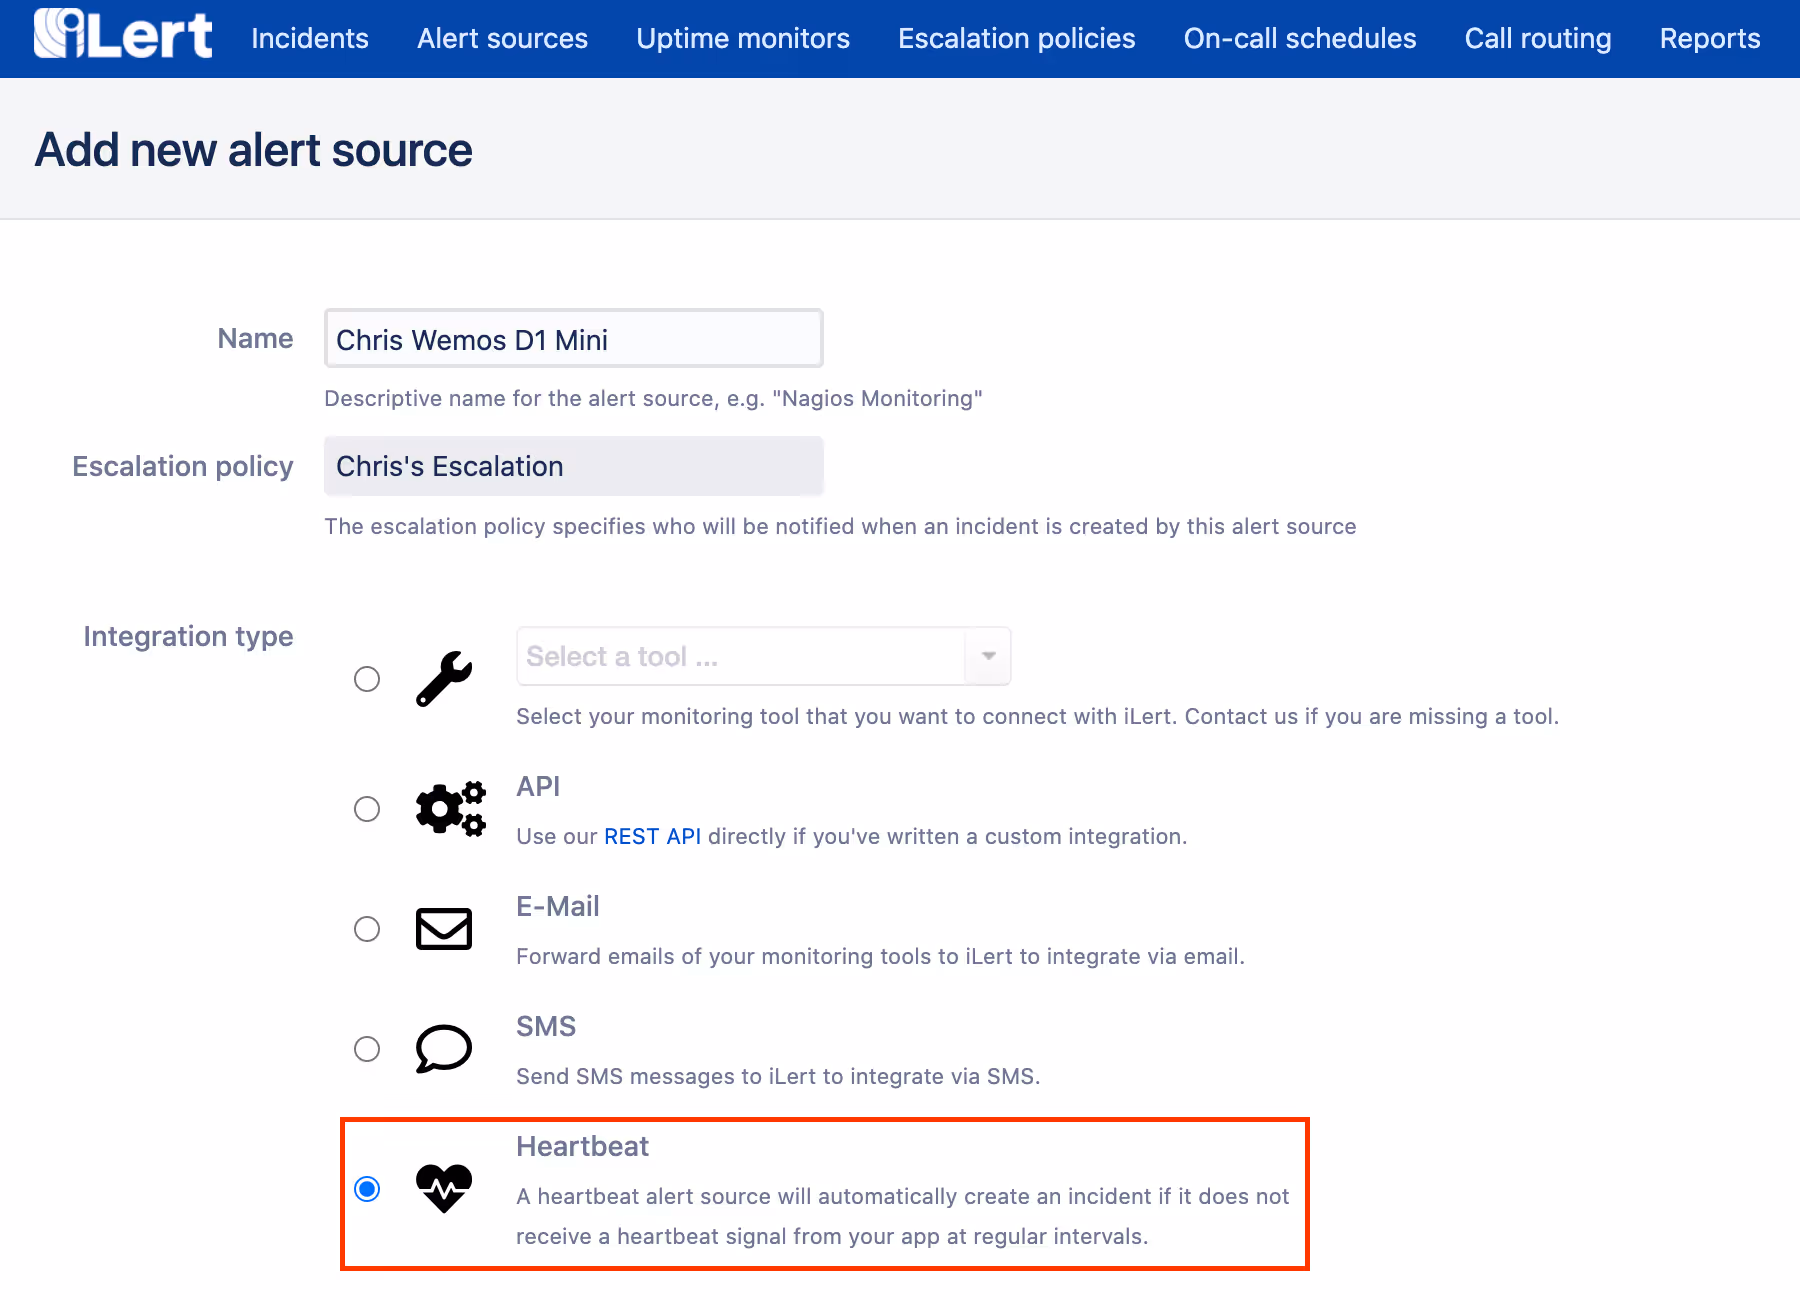
Choose Heartbeat as integration type and choose all other options according to your use-case. e.g. a 1 minute interval expects a heartbeat at least every 59 seconds to rate your alert source as healthy.
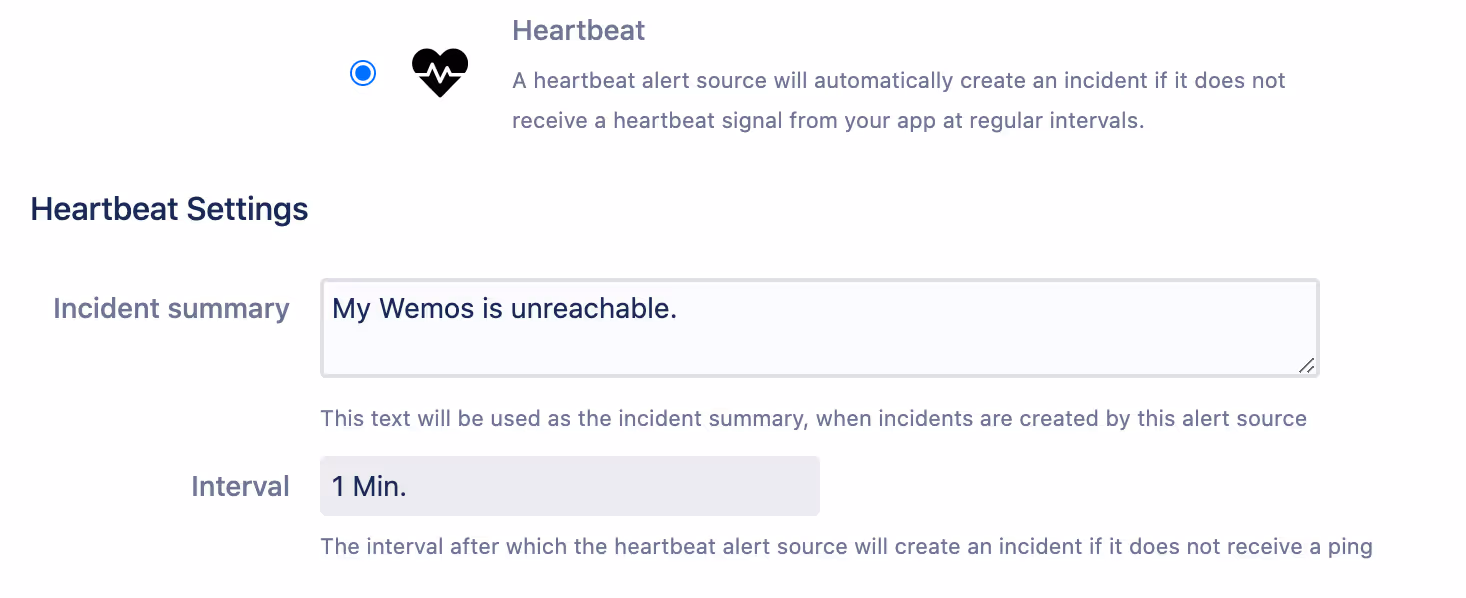
Hit save and you should see that your new heartbeat alert source is now created and in Unknown state. Which means that it has never received a heartbeat since creation.
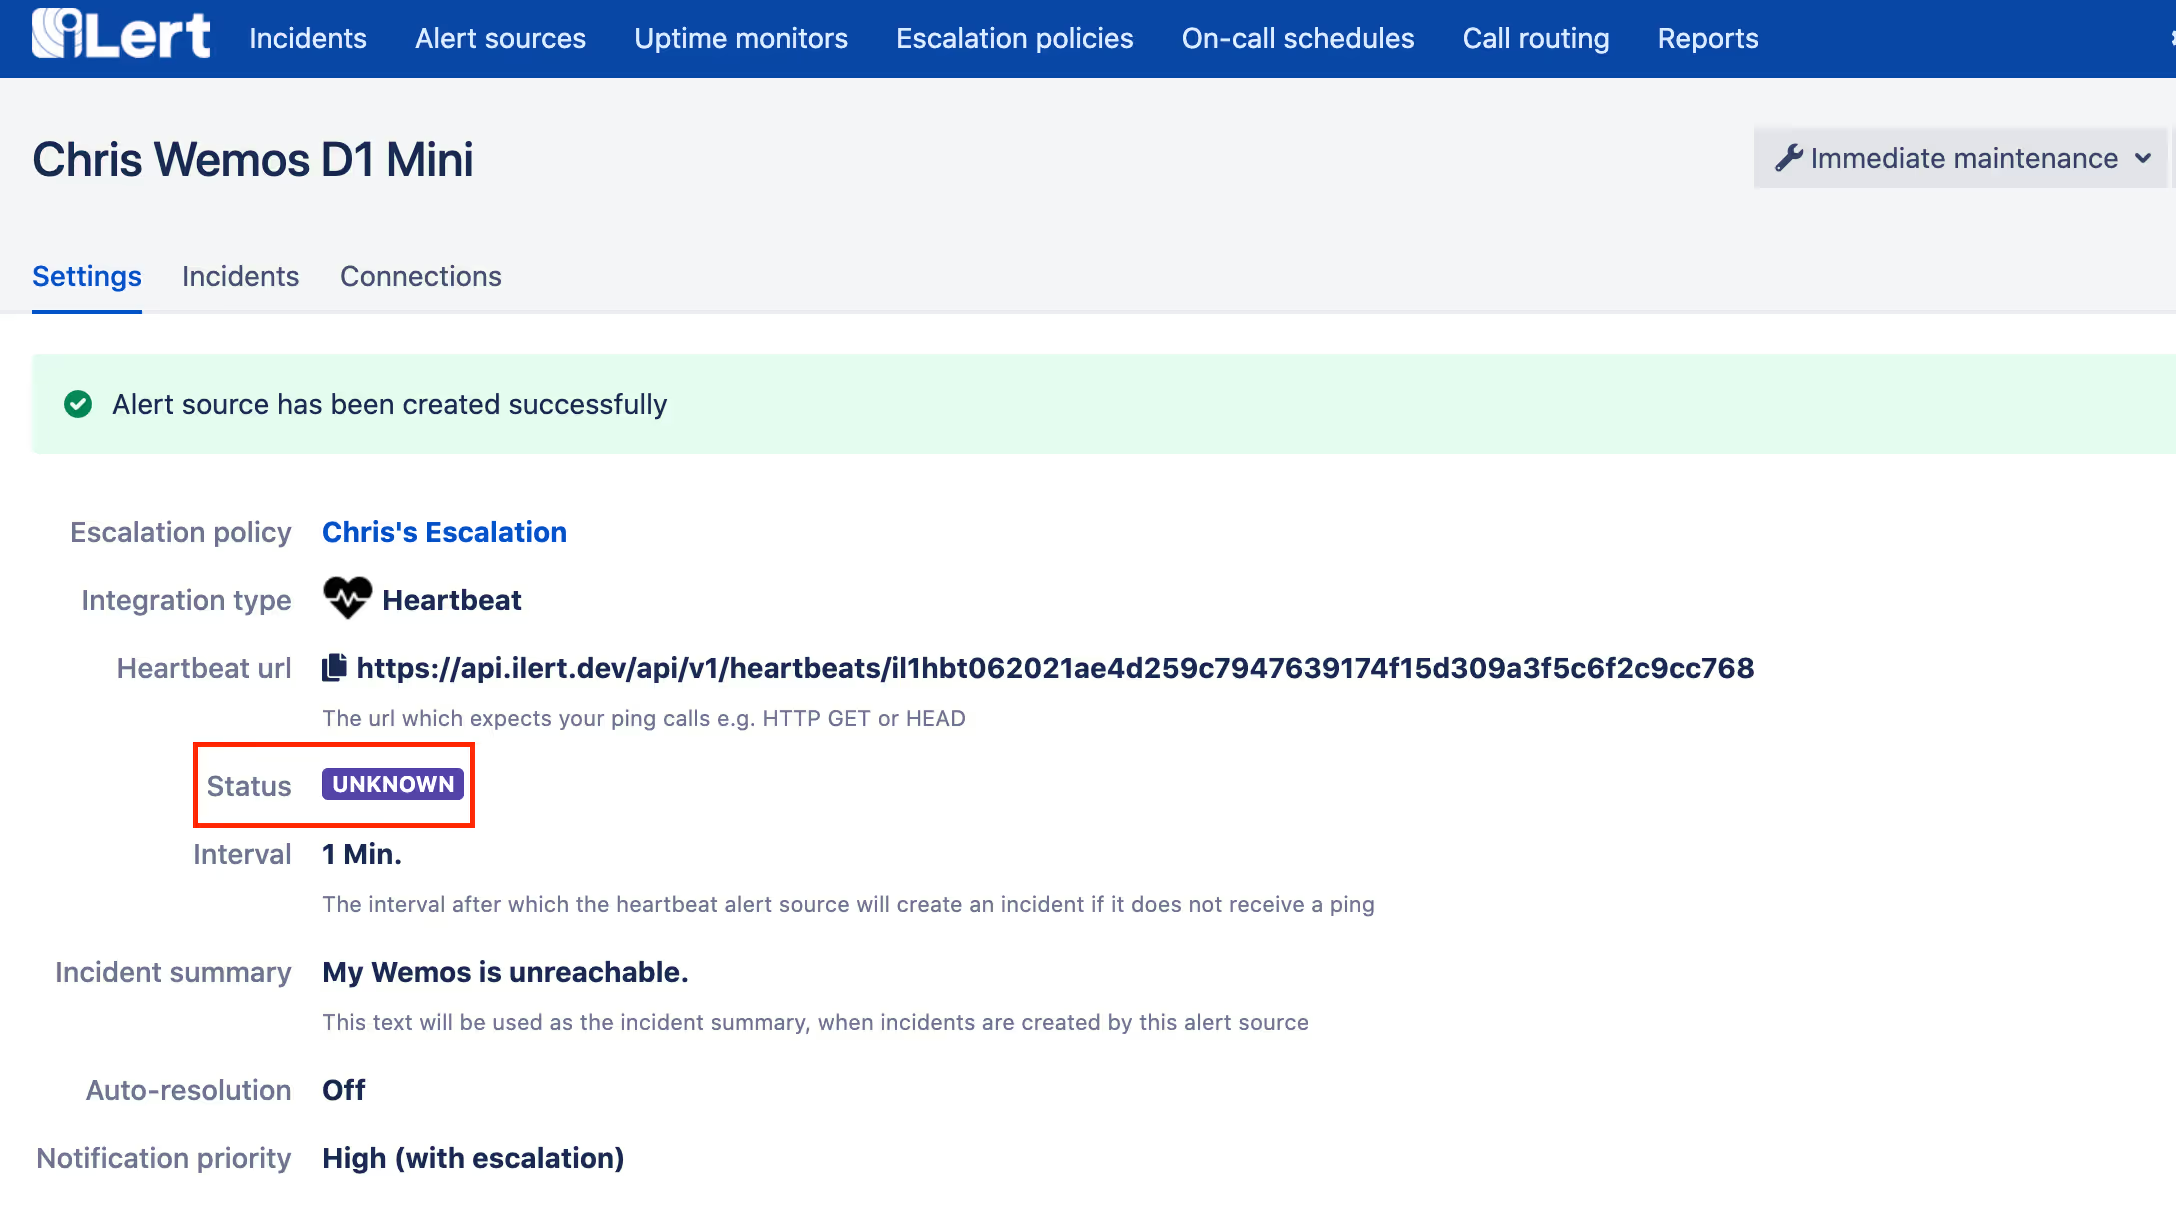
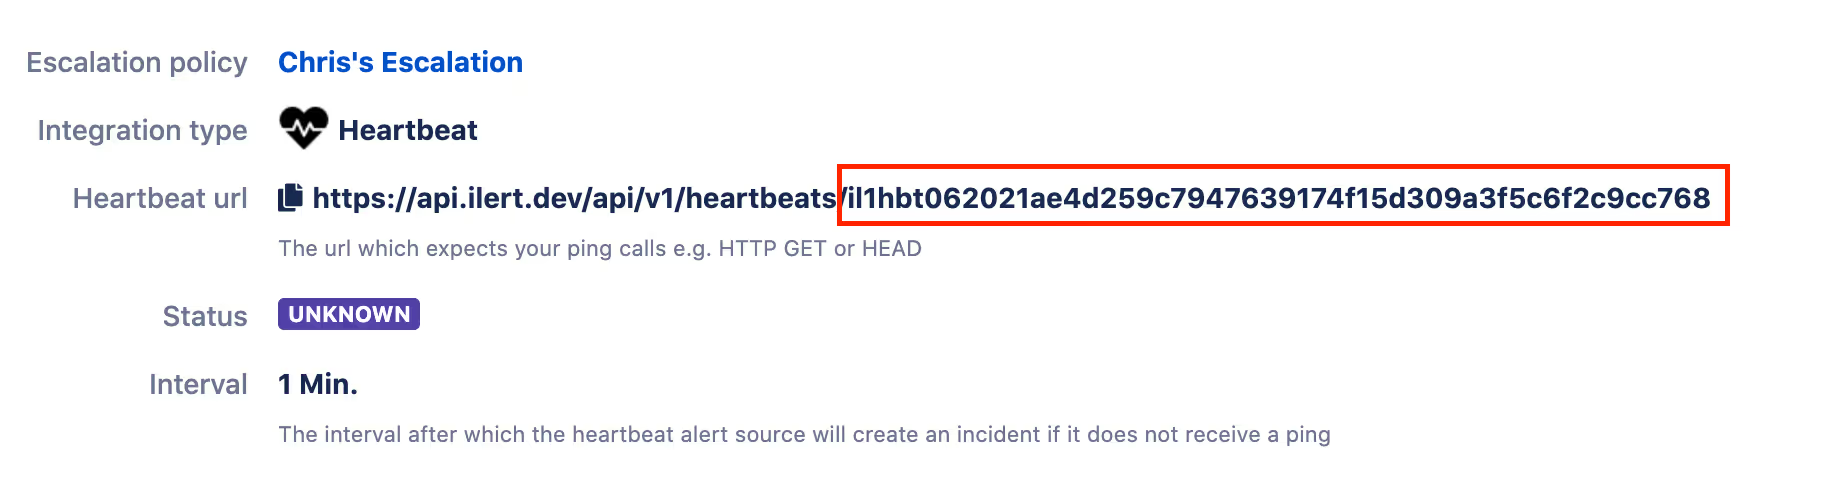
You should also be able to take the heartbeat alert source for a spin, just copy the whole Heartbeat url.
And run a simple curl command in your terminal.
You should see the proper result to your heartbeat ping.

And if you reload the alert source detail page of your heartbeat you should see that its status has now changed to Healthy.
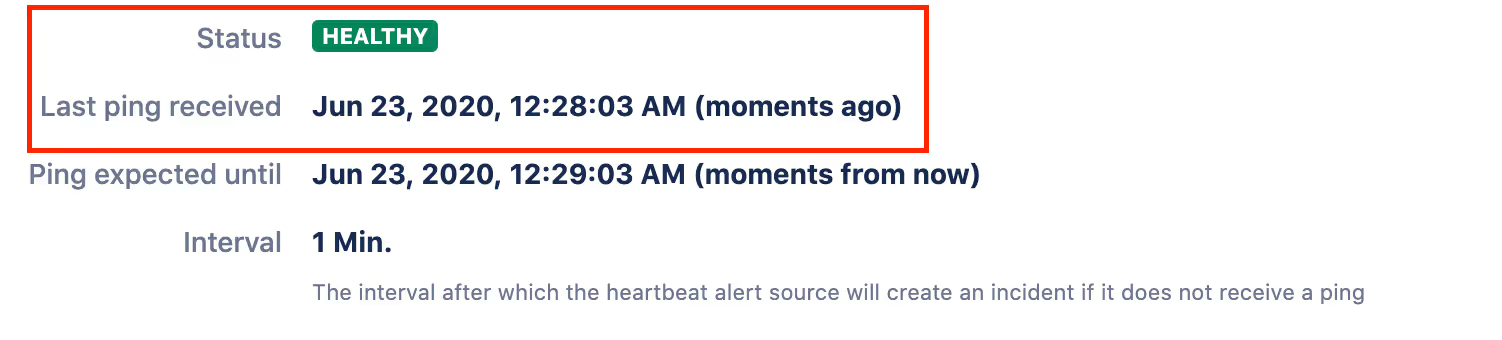
However keep in mind that you will probably miss the next heartbeat in a few seconds and that will create an incident in your ilert account and put your heartbeat into Expired state. But no worries, as soon as your IoT device starts sending heartbeats the incident will be automatically resolved and your heartbeat will be Healthy again.
Setting up heartbeat monitoring with ilert-arduino
Lets first add the ilert-arduino library to your PlatformIO libraries. Navigate to the PlatformIO home (as shown in Setup instructions) and move to the Libraries tab this time.
Search for ilert.
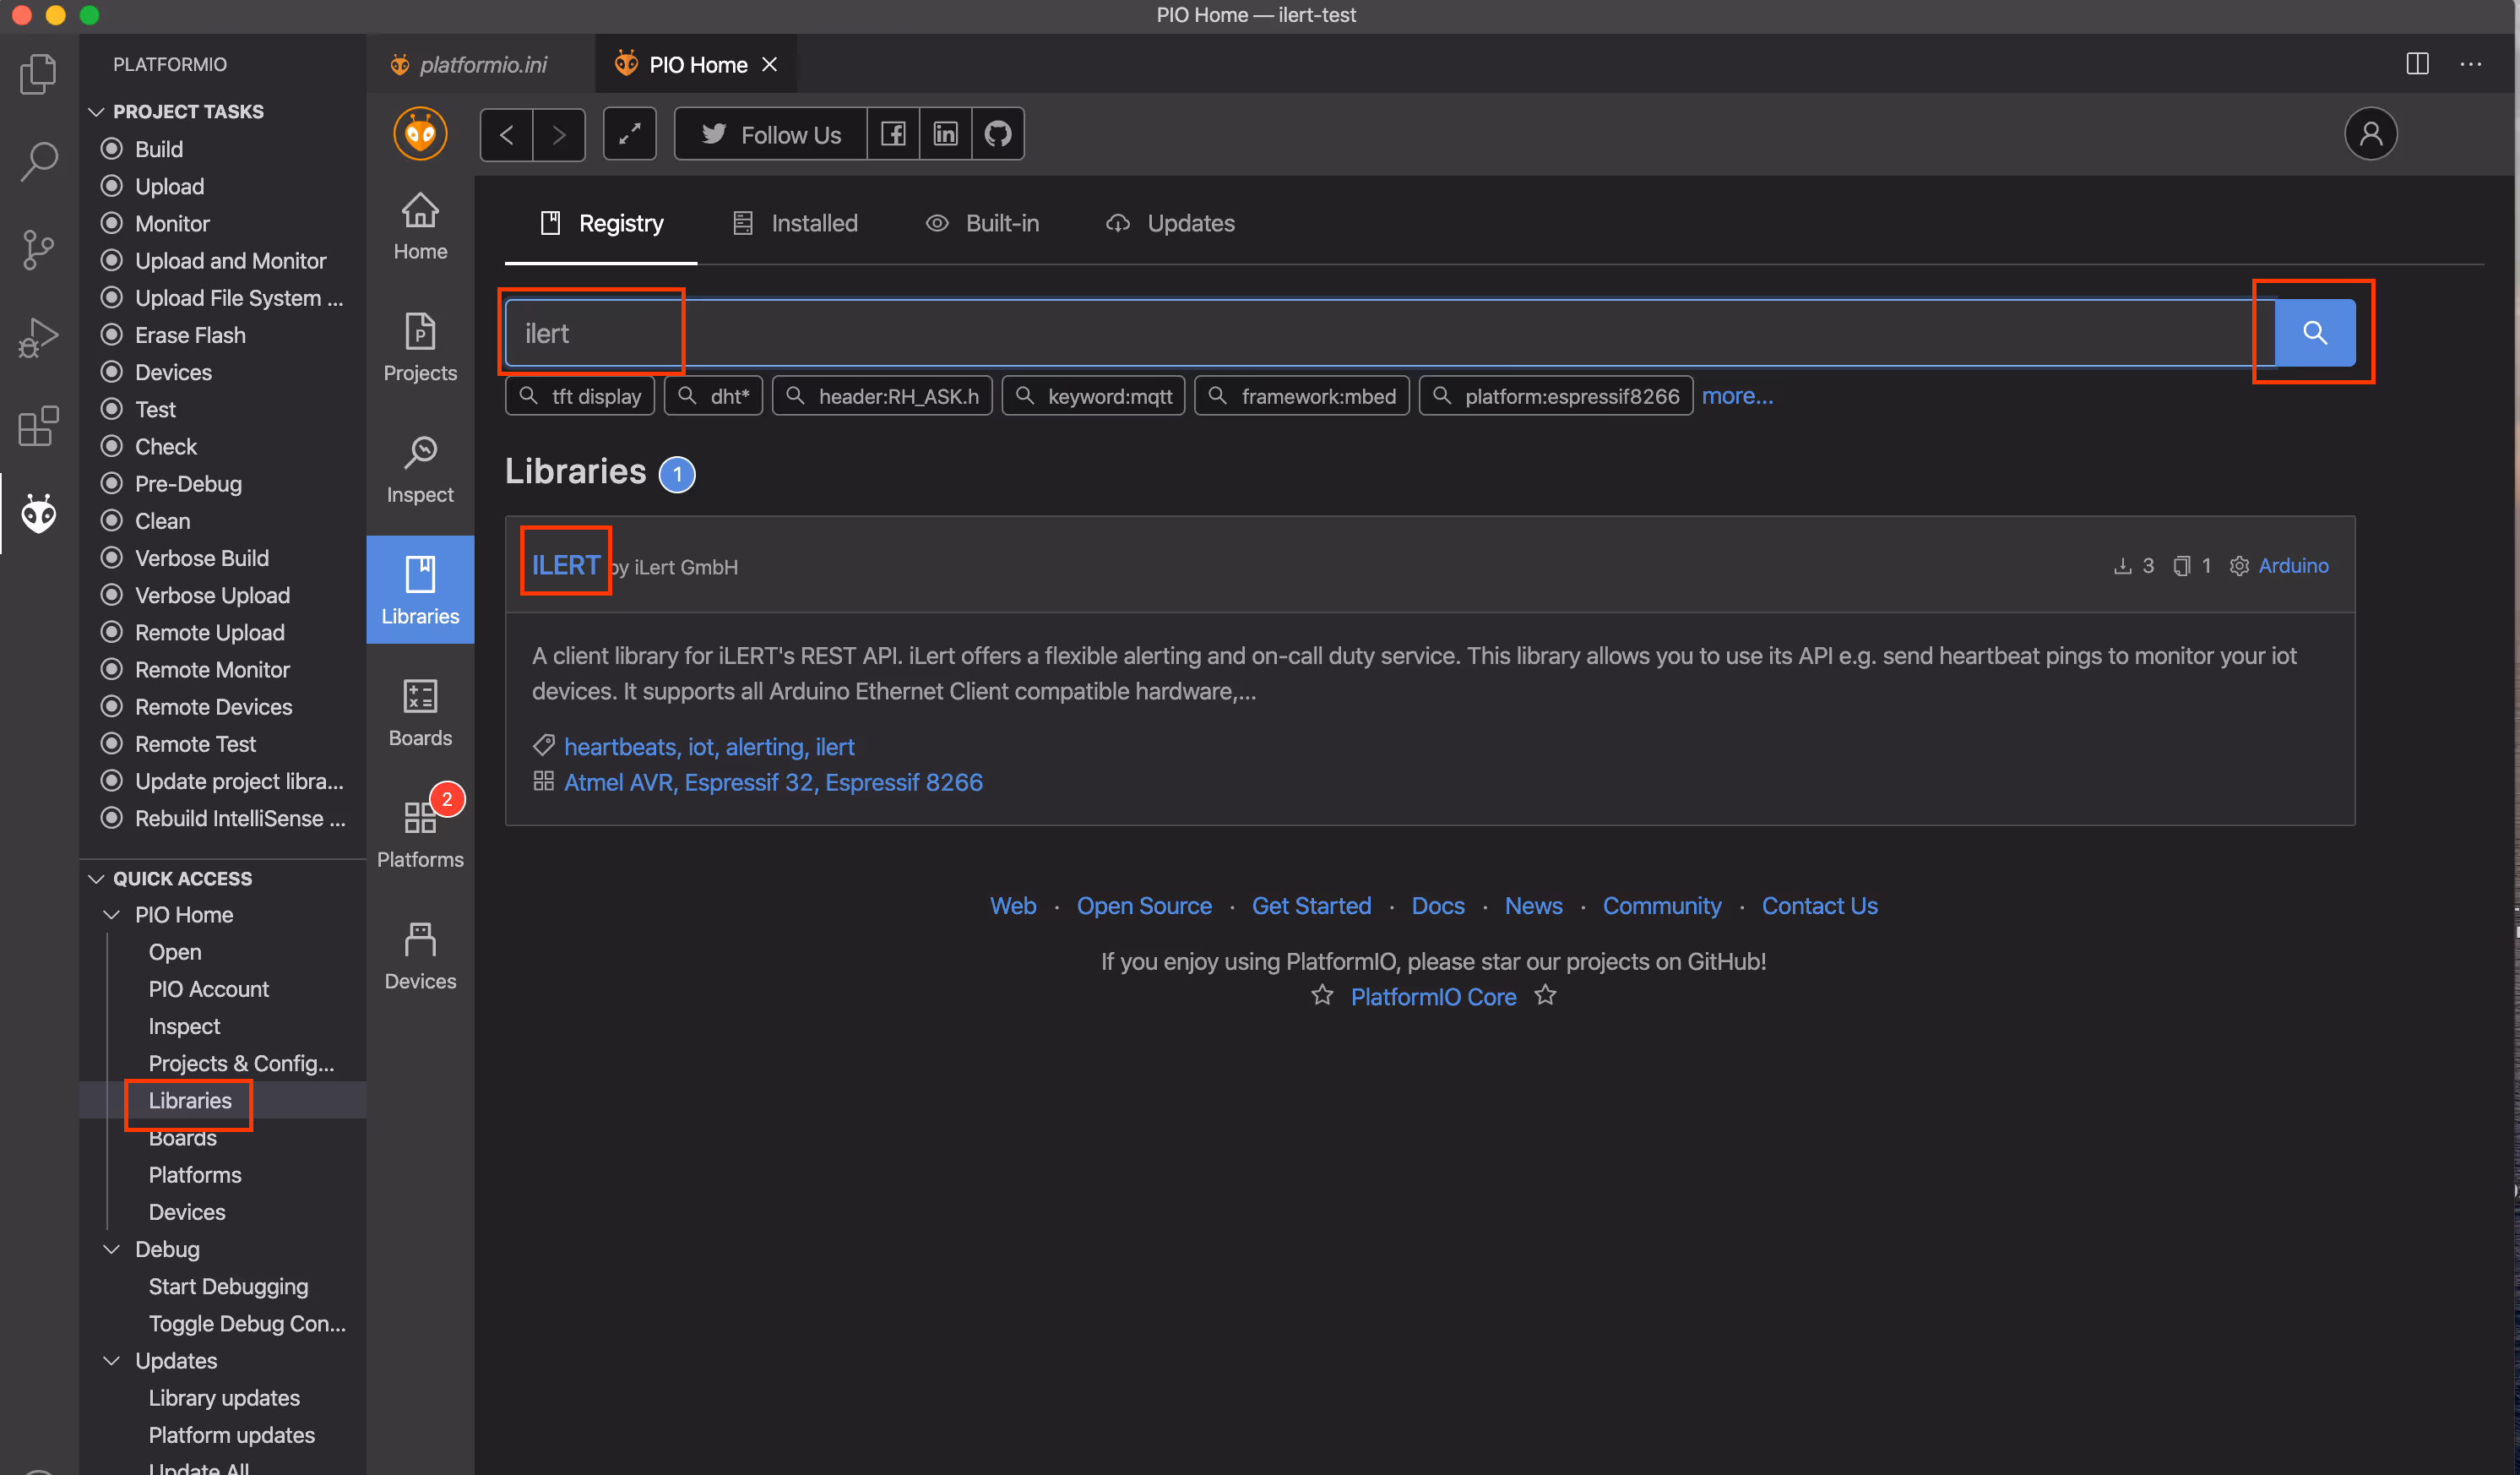
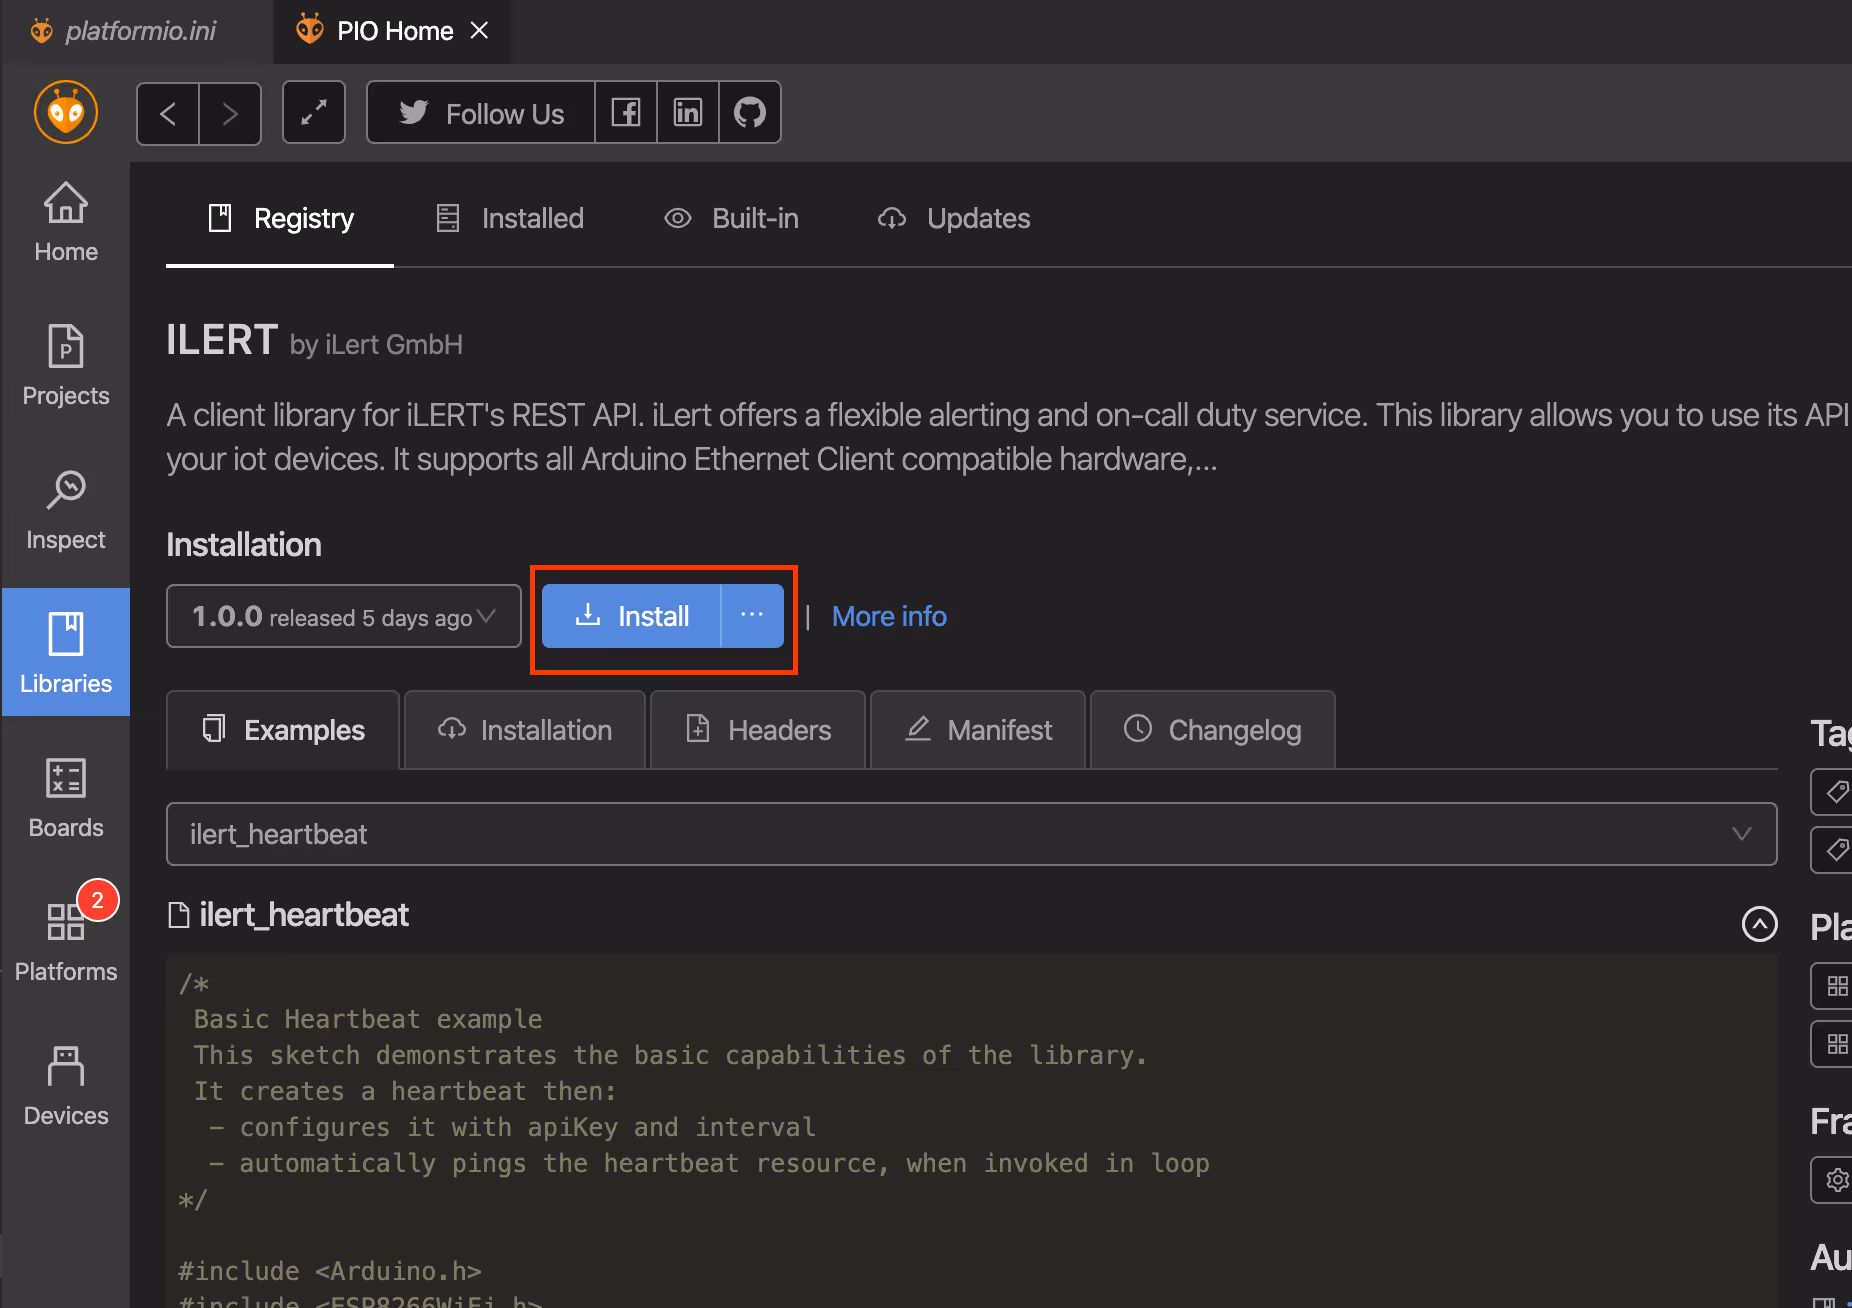
Click on the ilert library search result and install it.
We can now go back to our project and start using the iLert arduino library to create heartbeats, open up your src/main.cpp in the root of your project.
Creating a basic WIFI connection
Lets first create a basic setup that will connect our esp8266 to a local Wifi as soon as it boots up.
Sending ilert heartbeats via HTTP
Now that the Wifi connection is setup we can start sending heartbeats directly from our device using HTTP(S) and the public ilert API.
This requires not only a wifi connection, it does also require internet access.
Find here a full code sample for the Heartbeat example.
MQTT
MQTT (or Message Queuing Telemetry Transport) is a lightweight, publish-subscribe network protocol that transports messages between devices based on TCP/IP. It is designed for connections with remote locations where a “small code footprint” is required or the network bandwidth is limited.
MQTT broker
The broker acts as a post office, MQTT doesn’t use the address of the intended recipient but uses the subject line called “Topic”, and anyone who wants a copy of that message will subscribe to that topic. Multiple clients can receive the message from a single broker (one to many capability). Similarly, multiple publishers can publish topics to a single subscriber (many to one).
Each client can both produce and receive data by both publishing and subscribing, i.e. the devices can publish sensor data and still be able to receive the configuration information or control commands (MQTT is a bi-directional communication protocol). This helps in both sharing data, managing and controlling devices.
Setting up a broker
In case you are not familar with MQTT and have no broker running, there are plenty of open source brokers available. For the sake of not exploding this guide any further, I quickly will demonstrate how to start a plain (unsecured) broker to play around with:
Move to any empty directory of your choice and create a new file touch mqtt-broker.js to paste the following code:
Install aedes a Node.js based mqtt broker and start your local mqtt broker with:
aedes requires Node.js to run
You now have a plain mqtt broker running that listens on port 1883 and that can be used to follow the next steps in this guide.
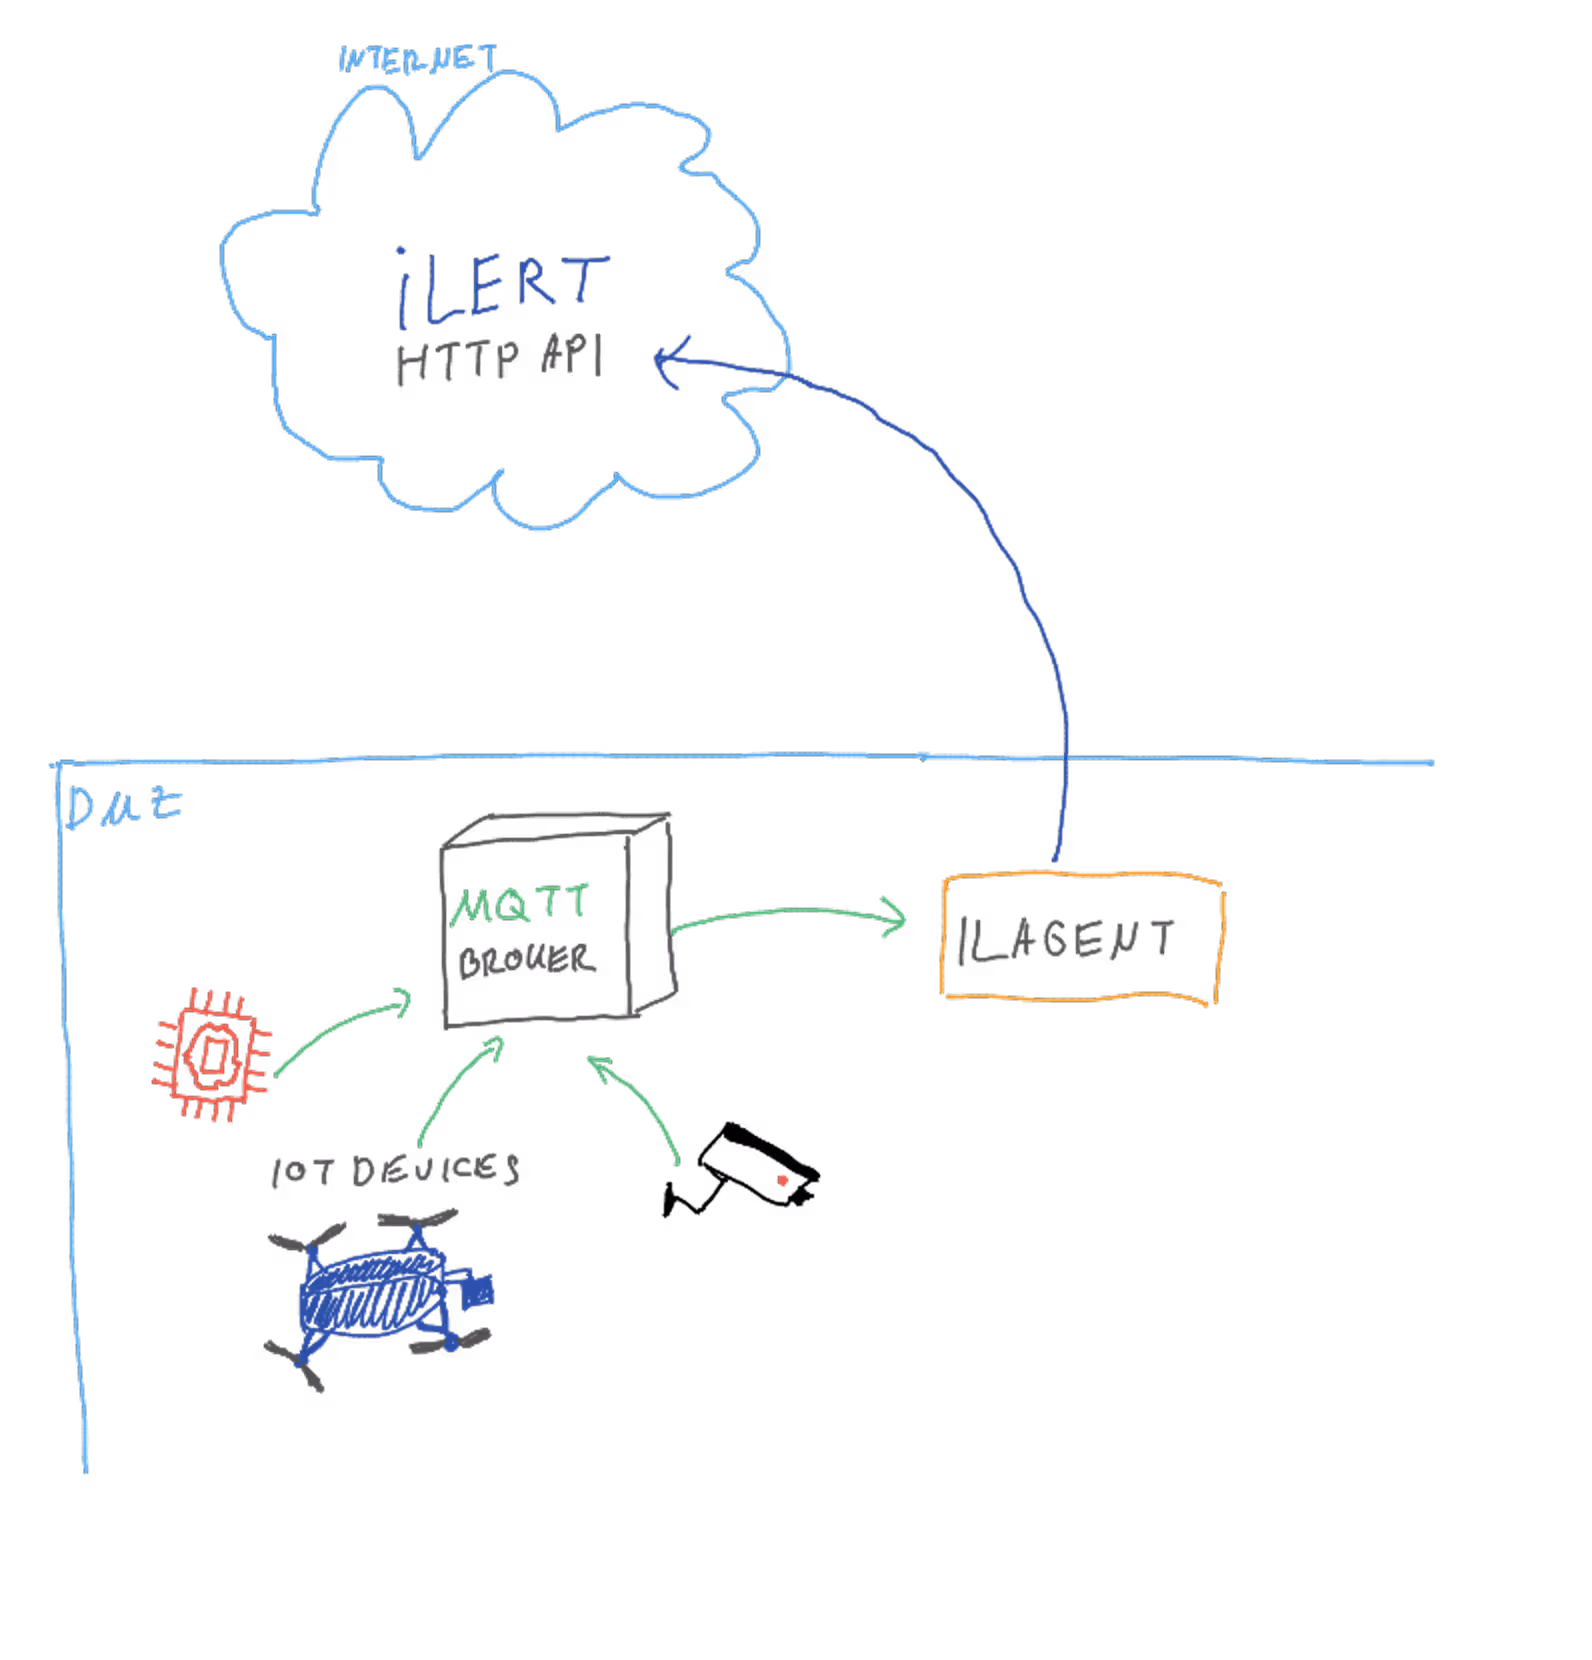
Running the ilagent as MQTT gateway
The ilagent is the swiss army knife in the iLert universe. Its main intention is to help iLert customers bring any kind of existing or non-existing monitoring use-cases live quickly.
Installing ilagent
In our case we can use its functionality as alert-gateway to help us relay local IoT device messages into the cloud. ilagent currently supports two relay modes for alert events or heartbeats: HTTP and MQTT.
We will use the later to create our MQTT gateway.
The ilagent binary is available for all popular OSes: Linux, MacOS, Windows and Unix Arm. On all the devices (except Windows) you can easily install the agent with our single line setup script:
Of course you can also grab the binary and install it as you like.
You can always validate a proper installation by running ilagent -V in your shell.
Starting the MQTT gateway
At the core this is what we are telling ilagent to do:
- daemon run as daemon process (constantly running application)
- -m 192.168.1.14 connect to MQTT broker on host 192.168.1.14
- -b il1hbtabc123 send a regular heartbeat (about every minute) to monitor the uptime of the running ilagent gateway
- -v -v set log output level to INFO
You should see an output like this, telling you that the connection to your MQTT broker has been made successfully.
In case you want to use the -b parameter you should create another heartbeat alert source, do not re-use the same alert source for multiple alert origins
You may also provide additional options if required for your environment
- -q 1883 port of the MQTT broker to connect to
- -n ilert name of the MQTT client
- -e ilert/events name of the MQTT topic to listen on to pipe alert events
- -r ilert/heartbeats name of the MQTT topic to listen on to pipe heartbeats
If you need a quick way to run the ilagent as daemon in the background you can re-use the following one-liner. However keep in mind that this will not automatically start ilagent in case your host system restarts.
You may of course (its actually suggested) run the ilagent right next to your broker on the same machine.
Setting up relayed heartbeat monitoring with MQTT
Now that our MQTT gateway is running, we can rewrite our esp8266 code to proxy heartbeats and events right through the ilagent using it as gateway without directly accessing the internet by itself.
Setting up a MQTT connection
We will extend our basic Wifi setup with an MQTT client that is able to connect to our MQTT broker. We will use this client to send messages, containing heartbeats and events, to MQTT topics that ilagent has subscribed to. ilagent will then take care of delivering these relayed heartbeats and events to ilert’s public API reliably.
Sending heartbeats relayed through MQTT
Now with our MQTT client connection standing, we can start sending heartbeats through mqtt messages. The ilert-arduino library offers methods to build the required mqtt message payloads for ilagent.
Sending alert events relayed through MQTT
The ilagent mqtt gateway also allows for alert events to be send through mqtt clients. The payload offers the same fexible options as the events API endpoint. The following example will create a high priority incident in iLert, make sure to replace the first parameter with your appropriate alert source’s api key.
Advancing
When managing your fleet, there is no need to make any changes in the UI. You can simply automate all your needs using ilert’s REST API.
Below is an example of a simple heartbeat alert source creation through our API. You can gather the api key of the alert source in the response of the HTTP request.
It is definitely possible for devices to provision themselves and start sending heartbeats.
Taking this further
If you liked this sneak peak into the world of IoT and MQTT for monitoring and alerting and are looking to take this further or implement it for your use-case, feel free to reach out to us for assistance or any questions you may have.